Monday, November 28, 2011

Fava Beans Rice

Oh yes! You can quickly make some lip smacking rice with these Fava Beans in it.

Fava Beans are also called Broad Beans. Avarakai in Tamil.

It is high in Protein & Fiber but low on Fats so it surely should be tried.

So let's get to cooking.


Get ready with:
  • Cooked Rice - 1 Bowl
  • Broad Beans - 12
  • Spring Onions - 2
  • Salt - As per taste
  • Oil - 2 teaspoons

Put it together:
  1. Trim the beans & chop each in 2 or 3 parts. You may chop them according to your wish however I like them bigger as they look delectable to me.
  2. Now heat a deep pot with water in it. When the water boils throw in the beans & let them get cooked. Remove from heat & strain when done.
  3. Ready a wok on high flame with 2 teaspoons of edible oil in it & add the fava beans & spring onions together. Saute for a minute.
  4. Now add the cooked rice & salt to this & mix in well.
  5. Your rice is ready to be served with some hot manchurian!

Note:
  • You may use normal onions if spring onions arent available although you will miss the greens & the lovely fresh taste
  • Serve them with any hot & spicy curry


Friday, November 18, 2011

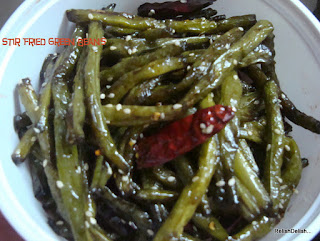
Stir Fried Chinese Green Beans


I remember going to Mainland China to enjoy some authentic chinese food
which I totally freak out on.

When I first tried them at the buffet I knew I had to cook these at home. These lovely fresh looking beans are first steamed & then thrown into the pan along with some delicious flavors. They make a great dish to go with any Chinese dinner, and the best part is... it can be prepared just in a few minutes.

Everytime I indulge in these stir fried green beans which is simply fingerlicking!!! Now I can cook them at home.

The spices are quickly stir fried with the long beans to bring out their flavors so the result is a fiery tasty yummy preparation to awaken your senses.


Let's collect:
  • Green Beans (washed & ends trimmed) - half a kilo
  • Whole red chillies - Handful
  • Soy Sauce - 1 tablespoon
  • Brown Sugar - 1/2 teaspoon
  • Sesame Seeds (White) - 1.5 teaspoon
  • Vegetable oil - 1.5 teaspoon
  • Salt  - as per taste


Method:

  1. Place the green beans over the steamer, cover & allow to steam for 5 mts. Take it off to cool it. You could pass it through cold water & drain again
  2. Now take a wok & add the oil. Let it heat to almost smoking point & then add the red chillies & soon add the green beans. Make sure the red chillies dont burn. You need to be quick here.
  3. Stir fry vigorously to avoid burning.
  4. Now add the soy sauce & brown sugar to this along with the required amount of salt.
  5. Continue to stir fry.
  6. At the end add the sesame seeds & toss them together.
  7. Shift them into your serving bowl & get ready to serve this exotic Chinese dish & enjoy the compliments coming your way!
 Note: 
  • You can avoid using the red paprikas/chillies yet enjoy the flavors
  • French beans is what I used
  • Some add a dash of vinegar too for a tang
  • Your wish to use any oil of your taste for the tossing


Tuesday, November 15, 2011

Celebrations with my Veggie Pizza!!!

Hello Folks!

Finally after more than 3 months I get some time to write.
Good news is I roped in a new work assignment for myself which has kept me very very busy. My domain still remains the same. However, this is an MNC & one of the best organization yet.
So I celebrate my comeback to Blogger & the new opportunity not with sweets but with my all time favorite Veggie Pizza.

One of the easiest Pizzas ever!


All you need is a packet of mozarella cheese, a Pizza base, 2 chopped tomatoes, 2 chopped onions, 2 chopped green chillies, pizza topping/tomato sauce & a microwave :)

Method:

Preheat the oven at 230 degree celsius for 2 mts. Meanwhile place the pizza base on the griller stand & apply a coating of butter & then the pizza topping or the tomato sauce. Now cover the pizza with the chopped vegetables & over the vegetables sprinkle a layer of grated mozarella cheese. When your oven is ready place the pizza inside & cook for 15mts.

Tadaaaa! Tis Ready! Come faaaast!!!

Note:

1. You may add some chopped capsicum, baby corn, mushrooms, jalapenos, olives (all of them or some of them). Totally depends on what you want on your plate

2. Some microwave oven wont allow you to preheat in such cases please dont heat it without placing anything inside it. Dangerous! You will have to increase the cooking time from 15 mts to 18 mts

3. Pizza topping sauce is available in the market however you may use tomato sauce instead

4. It is not necessary to apply butter. Tis totally optional!

5. Dont forget to let me know if/when you make it


Friday, July 8, 2011

Mangalore Banana Buns (Deep fried Banana buns)


First ever Konkani Snack I prepared!

Thanks to my dear friend P who introduced me to these wonderful Mangalore Banana Buns.
So, I dedicate this to P & all my 50 followers!


It does not really require any special skills or much effort.
All you need to know is to prepare dough & deep fry.

Yeah! These buns aren't baked but fried.


You will need:

  • Ripe Bananas - 1 cup
  • All purpose flour/Maida - 3 cups or some more
  • Cardamom - 3
  • Sugar - 3 tbsps
  • Curd - 2tbsps
  • Baking Soda - a pinch
  • Oil - for frying

Go for it:

In a large bowl mash the bananas with a fork. This is the best recipe to use up those over ripe bananas. Add sugar & mix it in to dissolve. You could use powdered sugar too. Put the curd & continue to beat them together. Add the flour, crushed/powdered cardamom & the baking soda. Work them together to form dough. You could add more flour if you feel it isnt coming together. Leave it overnight outside.

The dough will ferment & increase in quantity. Take lemon sized dough balls & roll them out round (it's okay if you cant get that shape right ;) ). I used some flour to dust the board & the rolling pin as the dough gets a little sticky.

Deep fry them one by one on medium flame. They will puff up. Turn sides & cook them well. You might have to lower the flame in between as the buns get browned easily. When done, transfer on paper towels to drain the excess oil.

If your buns are soft & smell sweet, they are ready to be relished!

You could enjoy these buns with butter/honey/tangy relishes/jams or just enjoy them plain.

Yes friends, you're all guessing it right. I indulged in these though my fitness trainer doesn't allow ;).

Note:
  • Use up over ripe bananas
  • You could also add crushed pepper, cumin seeds and some salt. I did not want that flavor so I did not add.
  • Many eat these sweet buns with salty accompaniments


Tuesday, June 14, 2011

Oh So Yummy Stuffed Cheela Roll (Stuffed Gramflour Pancakes)

Hello Friends!

I am following a weight loss regime. No! I am not starving at all. I am just eating right & exercising at the gym. I have lost 3 kilos in 4 weeks which is not bad a start. What do you say? :)


I surely do get tempted when I have to cook for my husband but to gain compliments instead of that fat I am ready to sacrifice till I get fitter. Now, that does not mean I dont get to eat yummy food. All you have to do is think of the right ingredients & put them together for that yummy tummy filling food.


Friends! Here are some healthy tips which could help you lose that extra flab:

1. Do not starve


2. Include a good share of fruits & salads in every meal

3. Breakfast should have a fruit/milk/brown bread/oats/juice


4. Drink fresh juices & soups before you get hunger pangs


5. Drink lots of water but make sure you cut down on that oily food so that your body doesnt retain the water you just consumed (Oily snack will have salt which retains the water in your body)


6. If at all you crave to eat any of the following then have it during lunch only - curd/rice/paneer/1 poori/1 pakoda/1 fried papad/aerated beverage/1 sweet/1 portion of pizza/1 bite of that huge pastry/lassi etc. Having none of them or some of them only once in a blue moon is okay


7. Dont eat rice or roti for dinner. Instead have a bowl of any dal (lentil) with loads of salad. You may have 1 roti if you really want. Once in a while rice is okay which means twice a week at the max.


8. Try brown rice instead of white rice.


9.If you dont have a gym closeby then you just start skipping/running or climbing stairs


Some of my confessions:


1. I enjoy a portion of curd or raita during my lunch


2. I hate some fruits which I have to eat & love some fruits which I shouldnt eat


3. I enjoy aamras or a mango shake for breakfast on a Sunday (thatz just an excuse to enjoy mangoes)


4. I have not been able to develop taste for brown rice so once in a week, mostly on saturdays or sundays I eat a rice dish (My birthday yesterday served as an excuse to enjoy Rajma Rice...yummm)


5. After a few days your body feels much lighter & fresh


6. I also exercise at the gym & I am loving myself more & more each day


Cheela/Chilla is a very good option when you plan to lose your extra fat/flab. It is made with gramflour paste. Gramflour consists of dietary fiber & protein.


To enjoy this Oh So Yummy Cheela you need:


Besan (Gramflour) - 1 cup
Ajwain (Carom seeds) - 1/4th teaspoon
Asafoetida - tiny pinch
Red Chilli flakes - as per tolerance
Salt - As per taste
Oil - if reqd.

For the Stuffing:

French Beans  - 100 gms
Carrots - 100 gms
Pepper - for seasoning
Salt - as per taste
Olive Oil - a few drops

Method:

Wash & cut the tip & end of the french beans & keep aside. Scrape & wash the carrots & cut lengthwise.
Put them in a cooker with a cup of water & cook on medium flame till 1 whistle. Put off the flame now but do nto open the lid, let it now cook in the cooker steam. On medium flame, in a non stick pan add some drops of olive oil. Now, discard the water & add the vegetables to this. Saute, add crushed pepper & salt to it. Your stuffing is ready!

To make the cheela (pancakes), just add all the ingredients except oil. A dropping consistency is not too watery or very thick. You will know exactly what I mean when you make the first pancake. You can add more water or gramflour if the consistency isnt quite what you require. Take a ladle full of batter & sprad on the already hot pan. The pan should be on high flame & you should lower it as soon you have spread the batter. You may use a few drops of oil to turn it if required. Else turn it & cook till it is done.

On the cheela place some stuffing in the middle & roll it. Your Cheela Roll is all set! Ready to be Served & Savoured.


Note:

1. There are some variations to this cheela, like:

- You could add some shredded onions, tomatoes & capsicum to this cheela paste
- The stuffing can have more vegetables in it
- You could spread some honey on this cheela & then place the stuffing to roll & enjoy

2. It is best enjoyed with sweet or a tangy dip. I avoided it though.


Saturday, June 11, 2011

Chilli Soya - Snack Healthy


When graduating from Delhi I lived in an all girls PG on rent.
As none of us could cook we, 'the already burdened half-dead freshers' looked out for all possibilities of feeding ourselves with some good food to stay alive.

We found out some numbers/visiting cards of the tiffin providers & zeroed-in on one of the most inviting visiting cards & called to place our very first mass order for dinner. We liked it. Though, the chapattis (flat breads) looked stale & half cooked, the dal was only coloured salty water, the curd had gone sour, the vegetable was covered with oil, yet we enjoyed it & decided to continue the service.

By the time we got back home for lunch the next day it was 3pm & we were famished. We found the tiffin boxes kept at the entrance & we happily picked it up & got ready to eat when I discovered that the vegetable had gone bad in that Delhi heat outside.

It was time to discontinue the tiffin service & engage a cook for fresh meals every day. She cooked good however took leaves without informing. But that did not put us off as those were the opportunities when we could demonstrate our culinary skills & experiment on each other & the food of course. 

On one such occasion a friend got this extremely dry scrubber like balls which she claimed to be edible & called it Soya. I could not believe it could be edible! But,  the vegetable pulao with the soya chunks just tasted fabulous. It was much softer, juicier & yummy. I then started developing the taste for Soya & have tried many dishes since then. One such dish is what I recommend to all those who like your food spicy yet healthy & that is Chilli Soya.

Ingredients required:
  • Soya Chunks - 100 gms
  • Shredded Onion - 3
  • Thinly sliced Tomato - 1
  • Ginger Garlic paste – 1 tbsp
  • Green chillies - as per tolerance
  • Soya sauce - as per taste
  • Green chilli sauce - as per tolerance
  • Red Chilli Powder - 1 tsp
  • Salt - as per taste
  • Oil - 3 tbsps


Method:
Take water in a pan to boil the soya & add salt to it. When done take it off the flame & drain it in a colander. Let it cool down & squeeze out all the extra water out of the chunks. Keep aside.
Now, take a wok & pour oil in it. Keep this on high flame & as soon as it gets smoking hot put the shredded onions in it. Saute & add the ginger garlic paste to it when the onions turn pink.
Leave it to cook for 2 mts on medium flame & then add salt & red chilli powder to it.
Continue to sauté for another 20 seconds & add the thinly sliced tomato to this. Let it cook till the tomatoes get pureed.
Add the soya chunks to this & cook for 5 mts.
Lastly add the sauces to it & cover it with a lid for a minute or two & take it off the flame.
Get ready to serve this healthy snack.

Note:
  • You could add some diced capsicum too
  • If you require some gravy add a spoonful of corn flour to a cup of water then pour & stir for a minute
  • If you don’t have green chilli sauce you could use red chilli sauce or just add extra slit green chillies to the dish. All this only if you could tolerate the taste
  • The  chilli soya (gravy) is best eaten with fried rice
  • The chilli soya (dry) can be added to plain noodles or can be eaten dry as a starter or for snacks


Saturday, May 21, 2011

Spicy Aloo Parwal / Potatoes & Pointed Gourd in Gravy

Arrgh! Yet another gourd!?!

This is exactly how I exclaimed when I saw this dish cooked by my mother in law. But what a tasty dish this is!!!

Aloo Parwal is a famous dish & often made at home. Now, because I demand.

This dish can be made in 15 mts & is a part of the main course meal. 

It is one of those recipes which makes me drool & eat the potatoes which I try & avoid otherwise.


To be able to make this mouthwatering dish you need:

  • Pointed Gourd (Parwal) - 8 nos.
  • Potatoes - 4 nos.
  • Cumin seeds (Jeera) - 2 tsp
  • Whole red chillies - 3 nos
  • Bay leaves - 2
  • Oil - 3 tbsp
  • Garam masala powder - 1 tsp
  • Red chilli powder - 1 tsp
  • Coriander powder (Dhaniya) - 2 tsp
  • Turmeric powder - 2 tsp
  • Asafoetida powder - A pinch
  • Salt - As per taste
  • Sugar - 2 tsp


Method:
Wash & par boil the potatoes. You could pressure cook them till a whistle or two & take it off flame. Once they cool down peel off the skin & keep aside.

Scrape the pointed gourd to remove any dirt & wash them. Now cut them lengthwise & then into halves. So the pointed gourd are big chunks now.

Take a bowl & add all the masalas, salt & 1 cup of water. Prepare a watery paste.

Ready a pressure cooker on medium flame, pour oil & increase the flame to high. When the oil gets smoking hot put jeera, whole red chillies, bay leaves & sugar. Now, add the cut pointed gourd to the oil & let it cook on high flame till it starts changing colour. Lower the flame to medium now & add the potatoes.

Add the watery masala paste to the veggies & saute till oil separates. Increase the flame again now.

After a few minutes add another cup of water cover the cooker with its lid & let it cook till 2 whistles.

Once it cools down, transfer it to a serving bowl & garnish with fresh coriander leaves.

I break the potatoes with my hand which gives uneven chunks & makes the dish more enjoyable. All you need to do is hold a potato in your hand & apply pressure as if making a fist. This will break the potatoes.
It is fun. You could ask your child to help you with this. It is great fun for them.

Note:

  • It is best eaten with rice & dal.
  • You could increase or decrease the gravy according to your liking.
  • If the gravy is more than required then take a potato out of the gravy, mash it well then mix it into the gravy to thicken it.


Friday, March 4, 2011

Paruppu Podi/ Yellow Lentil Chutney Powder

Paruppu Podi / Yellow Lentil Chutney Powder

This recipe comes from the Southern part of India. Yellow Lentil is also known as split pigeon peas.
It can be made within 5 minutes & is very easy. It is quite a saviour when you are starving.


We will need:
  • Arhar/Toor dal (Yellow Lentil) - 1small cup
  • Whole Dried Red chillies - As per tolerance, I took 3
  • Asafoetida - a pinch
  • Dessicated Coconut - 1 cup
  • Salt - As per taste
  • Oil - 1/2 teaspoon

Method:

Take a pan & pour 1/2 teaspoon oil just to grease the pan. Roast the dal & red chillies. When it is golden put off the flame & take it off the stove to stop cooking as we dont want it to get brown. Now, put this in a mixer jar & add the asafoetida & coconut to it & grind it. Grind it coarsely. Your Podi/Chutney Powder is ready. It will taste best for 1 full week if kept in the refrigerator.


Note:
  • The same process is to be followed to make Paruppu Thogayal/Yellow Lentil Chutney. You just need to add some water. However the shelf life decreases to 2-3 days.
  • You can try adding a few cloves of garlic for a different flavor. I dont use it in this preparation though.
  • It is best eaten with hot steaming rice with a dollop of ghee mixed with this thogayal or podi. 
  • You will be appreciated by all if you serve it with rasam rice & papad. So, try this & share your experience with me.


Sunday, February 27, 2011

Onion Crunchies (Pyaz ke Pakode)


Hey friends! Reposting the recipe with my clicks which were missing earlier.

These crunchies taste best with hot tea. We enjoy it whenever it rains in Delhi. You can enjoy them this winter too. When I was younger I have eaten them for lunch with rasam rice & have loved it.

Ingredients:


  • 3 medium sized Onions - thinly sliced
  • 4 green chillies - slit lengthwise & then chopped
  • Red Chilli Powder - as per taste
  • Gramflour (Besan) - 4 tbsps
  • Rice flour - 1 tbsps
  • Salt - As per taste
  • Water - 1/2 cup
  • Oil - for frying


Method:
After slicing the onions just work them with your hands to separate the slices. Now in a separate bowl add the gramflour, rice flour, red chilli powder, chopped green chillies & salt. Pour some water to it & make a paste. The paste shouldn't be very thin or thick. Now, add the onions to this batter. It should be such that the onions stick to it & the batter shouldn't drip. In a wok add oil to fry the crunchies. When the oil is about to smoke scatter small portions of these pakodas in the wok. These will get fried fast as the coating is not major & as the oil was very hot. As soon as you finish adding pakodas into the oil lower the flame. Keep turning them. When they start browning take them off the oil onto paper napkins.

Note:
1. These are best served with green chutney & tomato sauce
2. Riceflour has been used to make it tastier & crunchier


Saturday, February 19, 2011

Italian Spaghetti - Perfecto Primo

Love Italian food!!!
Perla, is my Italian friend. We became friends in college & I used to force her to get into the kitchen & cook some mouthwatering Italian dishes for us. This one is one of those I learnt from her.
It makes for a wonderful dinner at my home.

The Italian cuisine is considered as a prime example for a 'perfecto' cuisine, and is imitated all over the world.
Here's one of the 'Perfecto Primo' Italian recipe I cook. 
If you're wondering what primo means then it is The First Course of an Italian meal which usually consists of some hot dish like pasta, risotto or soup. 

YOU NEED:

  • Spaghetti Pasta - 200 gms
  • Large Ripe tomatoes - 4 nos.
  • Onion - 1 no.
  • Green Chillies - 5 nos.
  • Garlic - 2 cloves
  • Red chilli sauce - as per tolerance level
  • Grated Parmesan Cheese - as much as you require
  • Salt
  • Olive oil - 1 tbsp


METHOD
Pasta:
 Boil water in a deep stock pot, add half teaspoon oil & some salt in it. Slowly, add the pasta & keep stirring for a uniform cooking. Do not cover the pot as it might get over cooked. Cook as per instructions on the pack. When it gets cooked remove from heat & add some cold water so it stops cooking in the hot water. The pasta should be cooked yet firm. Now drain it in a colander & keep aside. Make sure you don't cover it with any lid. If your sauce is not ready keep working them with your hands to avoid clumping. If you feel it might then run some more cold water through it. It might clump only if you do not add oil during the boiling process.


Sauce:
In a skillet pour the olive oil & sauté the onions, crushed garlic until the onions are translucent. Blanch & purée the tomatoes with green chillies in a blender, add to the skillet.  Add salt & some red chilli sauce.


Mix it up:
Now, add the spaghetti pasta to this sauce & sprinkle the grated parmesan cheese on top. Add as much as you want unless you're on a diet :) 
Serve your Perfecto immediately!


NOTE: 

  • You could use any other cooking oil instead of olive oil
  • You could avoid using red chilli sauce

Do leave in a comment or write to me at relishdelish@gmail.com for any queries.


Tuesday, February 1, 2011

Spicy Hot Chilli Cauliflower/Gobhi Chilli

It is a starter & can be commonly found on the restaurant menu in India. 
This is made dry however you can order it with some thick gravy too which is prepared with the sauces.
If you have a liking for spicy food then you are in for a tongue tickling experience.

Here's how you experience it...


  • Cauliflower florets - 3 cups
  • Diced onion chunks - 1 cup
  • Slit green chillies - 10
  • Cornflour - 3 tbsp
  • Maize flour (Maida) - 3 tbsp
  • Salt - As per taste
  • Edible red/orange color - as required
  • Red chilli powder - as per tolerance
  • Red chilli sauce - as required
  • Green chilli sauce - as required
  • Tomato sauce - as required

Method:
In a deep pan boil water with 2 tsp salt. Immerse the cauliflower florets in it & let it cook till just done. Do not over cook it. Take them out when done & dry them on a paper towel. Mean while ready the batter by mixing in the maize flour, cornflour, salt, edible color & water. Be careful while preparing the batter. The consistency of the batter should be just as much to cover the florets well with a thin layer on top.
Now dip the florets & deep fry them in oil. You will not need to wait for long as the florets are already boiled so will cook fast. Now, take them out when done & place them on a paper towel to let the extra oil get absorbed in the paper towel. Next, check the pan/wok for remaining oil in which you deep fried the florets. We now need only 2 tbsp of oil in the wok so if there is extra oil take it out. Heat the oil on high flame & when it is about to get smoky add the diced onions & slit green chillies with salt & some red chilli powder. The onions should not get soft & soggy. You just need to saute them for a minute & then add green chilli sauce, red chilli sauce, soya sauce & tomato sauce & continue to saute for another 30 seconds. Now add the cauliflower florets & mix in with sauces to enjoy the spicy hot chilli cauliflower.

Note:

  • This is a dry dish. To make it with thick gravy just add the sauces in a larger quantity.
  • Some recipes will ask you to directly fry the florets however that will make the florets soggy so better boil them then pat dry before coating with the batter & frying.
  • I have seen my cousin adding diced capsicum to the recipe however I feel capsicum dominates the taste so I prefer not to make it an ingredient in this recipe.
  • You can enjoy them as snacks, starters or with fried rice, roti (indian flat bread).
  • Tomato sauce if put in larger quantity will make the dish sweet so be careful while adding it.


Sunday, January 23, 2011

Spinach Poori (Palak ki poori)


My Sunday Brunch Idea!!

Spinach is one of the most nutritious and healthy greens among all vegetables. Though low in calories, it contains higher concentrations of minerals, vitamins and other phytonutrients. Spinach also has a high calcium content.
Spinach is always recommended by the nutritionists. 
Don't you remember our dear "Popeye the Sailor Man"?? After all he becomes the strongest after consuming Spinach.

I generally don't promote deep fried food at home. The food submerged in hot oil is not so good but surely is a delectable way to enjoy food. 
Being a Sunday today & the demands coming in from my husband dear I chose to cook the hot sizzling pooris. Also, the fresh green leafy veggie was just brought in so it got me thinking & finally the recipe is here....

You need:
  • Spinach - 1/2 kg
  • Wheat Flour - 1/2 kg
  • Green Chillies - according to ur tolerance. I took 8
  • Salt - as per taste
  • Oil - for deep frying

Method:
Wash the spinach leaves & put them in a grinder with the green chillies. Grind to make a paste. Add the paste in the wheat flour with the salt to make dough. Knead it a little hard. If too soft the pooris will absorb more oil. 
Now, heat a wok  with oil in it for deep frying & meanwhile with a rolling pin make the pooris in the shape you desire.. mostly it is round or oval in shape. Now immerse it in the hot oil & voila the pooris are ready. Serve them hot with chhole or aamras.


Travel Ideas

Do Not Copy - All the material unless otherwise mentioned are copyright of © Relish Delish... .

MyFreeCopyright.com Registered & Protected